The Radiogram Portal
There are two motivations for this project: The first is to provide a platform to explain to the general public what Amateur Radio messaging is all about — to give a basic introduction to this part of our public service capability, and then to provide an easy way for someone who’s not a ham to submit a message for origination. The second is to try to inject more true third-party traffic into our traffic system.
Start by taking a look at the main Radiogram page — this is the page where the general public can submit a new Radiogram.
Becoming a Portal Radiogrammer
The first step is to sign up to become a “Radiogrammer.” A Radiogrammer is a licensed Amateur in the US or Canada who is familiar with formal traffic-handling procedures and who would like to regularly check in to the Portal to pick up and handle third-party messages for origination.
To be added to the Radiogrammer roster, please sign up by filling out the form here. The Radiogram Portal administrator will process your application and, if you are accepted, will create a username that you can use to log in to pick up traffic.
This process will result in you receiving an automated email from WordPress with a link for setting a permanent password.
Once your account is set up, you should log in and set a secure password that you can remember.
Using the Portal
When you sign up to become a Radiogrammer, you will be assigned an NTS Region that corresponds to your ZIP code or postal code. When you sign into your account on the Radiogram Portal, initially you’ll only see messages that have been submitted within your region. But if a message is submitted to the system and not handled by someone in the same region within a few hours, the message will appear on every Radiogrammer’s list, and becomes available to be handled by any Radiogrammer, in any region.
Once you’re signed up, you can log into the Portal at any time at this URL:
https://nts2.arrl.org/radiogram-messages/
After you’ve signed in, you will see the Available Radiograms page, similar to the view below.
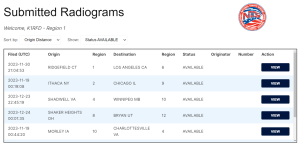
By default, this list shows messages which have been submitted to the system (typically by non-hams), and are now available to be handled for origination as formal traffic. Your task, as a Radiogrammer, is to check this list periodically for messages, pick them up, and originate them over Amateur Radio in the usual way as formal traffic, using voice, digital, or CW.
There are two choices at the top of the page:
Sort by
Origin Distance:
Displays available Radiograms in increasing order of distance from your postal code, based on the postal code of the person who submitted the message. This is a useful way to bubble messages from your own NTS Region to the top of the list. To maximize the benefit of Amateur Radio, the goal is to give priority to Radiogrammers who are in the same Region as the city of origin to handle any such messages.
Time Filed:
Sorts available Radiograms in descending order of their filing time, irrespective of location. The ones most recently submitted appear at the top of the list.
Show
Status AVAILABLE:
Displays only those Radiograms which have been submitted to the system, but not yet handled; these have a status of Available.
My Originations:
Displays only those Radiograms which you have previously handled for origination. (This view is useful if you need to go back and look up contact information for the submitter of a message for which you’ve received a reply.) This list will show all messages with your callsign as station of origin, either Handling or Sent.
All Messages:
Displays all Radiograms in the system, including those which have already been handled (or deleted).
Messages List
The Messages List shows all messages which match the selected criteria, along with key data such as the city and region of origin and destination. If a message has already been handled, the origin station and the message number is also shown. This list is scrollable if the list is long.
To see all details for a message, click the corresponding View button.
Message Actions
After Viewing a message, there are two action buttons below the message which might be displayed, depending on its disposition:
Handle
Click this button to pick up a message for origination by your station. (You must assign it a message number first.) This marks the message as Handling, and inserts your callsign as the station of origin in the database. The Portal then displays to you the message in standard Radiogram format, from which you can Copy or Print. At this point, please originate the message as formal traffic in the usual way over Amateur Radio, using voice, digital, or CW.
When you’ve finished sending the message, click the Mark Message as Sent button. (If for any reason you’re not able to send it, please click Return Message to Available, so that another Radiogrammer can pick it up).
Delete
Click this button to mark a message as Deleted, and provide a reason for having done so. This is typically used if you encounter a message with content that’s inappropriate for Amateur Radio messaging, and therefore can’t be originated. Our current policy is to simply delete any such message, rather than trying to edit it or contact the submitter. (The reason you provide is stored only in the database as a notation.)
The Radiogram Portal Administrator
There is a “super user” role associated with the Radiogram Portal system; the Radiogram Portal Administrator has several responsibilities and special capabilities that they can use to administer messages. These include:
- The ability to process new Radiogrammer requests and create user logins on the system
- The ability to remove messages from the system if they cannot or should not be handled
- The ability to generate reports on the traffic that the system has handled
Official Communications
We have set up a groups.io list for “Radiogrammers” use. You can subscribe to this list at radiogrammers+subscribe@groups.io. This list will be used to share information and updates about the Radiogram Portal system as well as a means to share best practices and problems. This is also a great way to contact the Portal Administrator, if you have a question or concern.